Sour Cream Pound Cake Recipe
I’ll open with what you’re getting: a Sour Cream Pound Cake Recipe that bakes up rich, buttery, and sliceable. Think golden crust, tight crumb, and plenty of old-school charm without the dry edges.
This loaf is dense in the classic way, yet tender and moist thanks to the dairy and gentle mixing. I use a bundt or tube pan because it gives reliable rise and a friendly presentation for guests.
Method preview: cream butter and sugar, add the dairy, then alternate dry ingredients with eggs. Bake low and slow — 325°F is your friend — and use the toothpick test for doneness.
Flavor goes everywhere: vanilla base with optional almond or lemon. It freezes well and makes a perfect make-ahead dessert for holidays or Sunday dinners. Patience pays off here, and I promise the payoff is worth it.
Why This Sour Cream Pound Cake Stays Moist With a Tender Crumb
Moistness and a fine crumb come from balancing fat, acid, and gentle leavening—here’s how that works. I like to think of the dairy as a texture fixer and flavor booster in one.
What the dairy does for texture and richness
Full-fat sour cream adds fat and water, so slices stay tender instead of dry. It also lends a gentle tang that keeps sweetness bright.
That tang helps the loaf taste richer without feeling heavy. The result is a tight but tender crumb you can slice cleanly.
How baking soda reacts with acid for better rise
Baking soda needs an acid to activate. Sour cream supplies that acid, so the soda produces lift during the long bake.
In a bundt pan or tube pan, batter climbs the central column slowly. Proper activation reduces tunnels and gives an even crumb.
The go-to extract trio
- Vanilla extract for warm, familiar flavor.
- Almond extract for bakery-like depth.
- Lemon extract for a bright, subtle note.
| Ingredient | Role | Effect on Texture |
|---|---|---|
| Sour cream | Fat + acid | Moist, tender crumb with mild tang |
| Baking soda | Leavening (with acid) | Cleaner rise, fewer tunnels |
| Vanilla / almond / lemon extract | Flavor layering | Buttery warmth, depth, and bright finish |
| Low oven time (long bake) | Slow structure set | Even bake without drying edges |
Ingredients You’ll Need for a Classic Cream Pound Cake

Good baking begins with good ingredients—here’s what you’ll want on hand. These are everyday pantry items, not a specialty-store hunt.
Dry essentials
All-purpose flour is the right choice here. It gives structure without making the crumb tough.
Sift flour before measuring to avoid packed scoops. Accurate cups and teaspoons keep the texture repeatable.
Rich ingredients
Use unsalted butter so you control salt levels. Properly softened butter is soft to the touch, not melted.
Granulated sugar sweetens and helps with browning. Full-fat sour cream adds moisture and richness—I prefer the party version for best results.
Eggs and flavor
Room-temperature eggs mix in smoothly and help batter rise. Cold eggs can make the mix look curdled and dense.
Vanilla extract is the base; almond or lemon extract are optional accents. Keep extracts balanced—start with teaspoon measurements and adjust sparingly.
| Ingredient | Why it matters | Tip |
|---|---|---|
| All-purpose flour | Structure and balanced gluten | Sift, spoon into cup, level off |
| Baking soda + salt | Soda reacts with dairy; salt brightens flavor | Measure teaspoons carefully |
| Unsalted butter | Fat, flavor, and tender crumb | Softened, not melted |
| Granulated sugar | Sweetness and crumb texture | Use measured cups for consistency |
| Sour cream & eggs | Moisture, richness, and lift | Full-fat dairy and room eggs for best results |
Pan and Equipment Setup for Pound Cake Success
Pick the right pan and the whole bake feels easier from the start. A tube pan gives a classic, old-school rise while a bundt pan offers those pretty curves for serving. Aim for 10–12 cup capacity; a 9.5-inch bundt pan is a great real-life benchmark for this batter and timing.
Grease and flour the pan the right way
Coat every nook with shortening, then dust with flour. This double step beats simple butter greasing because long baking and high sugar make sticking likely.
Let the pan rest on the counter for 10-20 minutes so the loaf is warm, not hot, before you invert onto the wire rack. That window helps a clean release and avoids tears when you unmold.
Tools that make the job smooth
- Hand or stand mixer for proper creaming.
- A couple of bowls to stage dry and wet ingredients.
- A rubber spatula to scrape the bowl clean.
- A wire rack ready to catch the loaf and let air circulate.
| Pan type | Capacity | Best for |
|---|---|---|
| Tube pan | 10–12 cups | Even rise, old-school texture |
| Bundt pan | 9–12 cups (9.5″ ideal) | Presentation, slightly faster browning |
| Unmolding prep | Shortening + flour | Prevents sticking during long baking |
Set your workspace early so you’re not scrambling while the cake cools. When it’s wrapped later, plastic wrap or an airtight container keeps slices fresh for make-ahead plans.
Sour Cream Pound Cake Recipe Steps From Bowl to Oven

Before you touch the mixer, set the oven to 325°F and ready the pan. Grease and flour every nook so the loaf releases cleanly after the long bake.
Preheat and prep
Preheat to 325°F so the temperature is steady when you slide the pan in. Use a 10–12 cup tube or a 9.5-inch bundt for best results.
Sift dry ingredients
Sift flour, baking soda, and salt into a bowl. This prevents pockets of soda and keeps the crumb even and tender.
Creaming and mixing
Cream butter and sugar in the mixer for about three minutes until pale and fluffy. That step builds structure, so don’t rush it.
Adding dairy and eggs
Mix in sour cream on low and scrape the sides of the bowl. Whisk eggs in a separate cup and add them gradually so the batter stays smooth and emulsified.
Alternate and finish
Alternate adding dry ingredients with the eggs. Fold and mix until the batter is light and whipped but not overworked.
Pan and bake
Spoon batter into the prepared pan, smooth the top, and gently tap the pan a few times to release air bubbles. Bake about 1 hour 15–20 minutes; check doneness with a toothpick or skewer.
- Tip: keep ingredients at room temperature for even mixing.
- Tip: if the top browns too fast, tent with foil partway through baking.
| Step | Why | Timing |
|---|---|---|
| Preheat & prep pan | Stable oven temp and easy release | 2–5 minutes |
| Cream butter & sugar | Builds structure and lift | ~3 minutes |
| Bake | Low and slow for even set | 1 hour 15–20 minutes |
Baking Time, Doneness, and Cooling Without Drying It Out
Timing the oven and the cool-down makes the difference between a silky slice and a dry one. For this loaf, the “low and slow” approach sets structure without over-drying the interior.
How long to bake and why it matters
Bake at 325°F for about 1 hour 15–20 minutes in most pans. Some ovens or deeper pans may need up to an hour 30 minutes. The long time lets the batter set evenly and gives that fine, tender texture every home baker wants.
Toothpick test and visual cues
Insert a toothpick near the center. If it comes clean, you’re done. A few moist crumbs are actually ideal; if wet batter clings, give it more minutes. Look for a deep golden top and edges pulling slightly from the pan as additional signs of doneness.
Cooling timeline and tenting
Let the loaf rest in the pan for 10–20 minutes, warm but not hot. Then invert onto a wire rack and allow it to cool to room temperature. This way the crumb sets and steam redistributes—slice too early and you lose that tender texture.
If the top browns too fast, tent loosely with foil after the first 45–50 minutes so the interior can finish without burning the exterior. Calm, steady baking is the best way to get reliably delicious results.
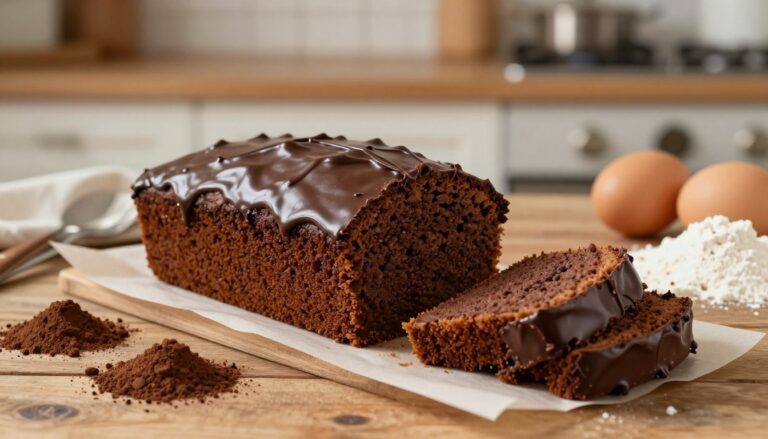
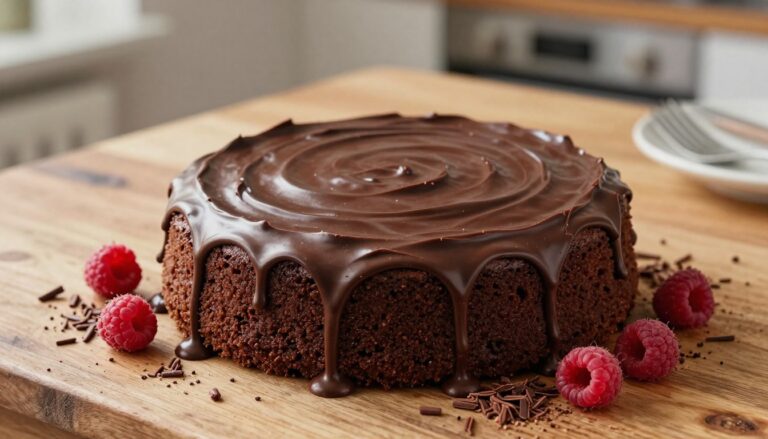
Vanilla Glaze Options and Finishing Touches
A glossy glaze makes a simple loaf feel like bakery-level magic. I give two easy paths so you can pick the vibe: a classic vanilla icing for a shiny, light drizzle or a butter-based topping for thicker, bakery-style coverage.
Classic vanilla icing (light drizzle)
Whisk 1 cup powdered sugar with 2–3 tablespoons heavy cream, a teaspoon vanilla extract, and a pinch of fine sea salt. Add the cream one tablespoon at a time until the glaze falls in slow ribbons—perfect for a delicate drizzle.
Butter-based finish (full coverage)
Beat 1 cup powdered sugar with 4 tablespoons softened butter, 1–2 tablespoons milk, and a splash of vanilla. This version pours thicker and sets opaque, great when you want full coverage that looks like it walked out of a bakery.
Consistency, timing, and serving
Always glaze only after the loaf is completely cool—do this too soon and the topping will melt away in minutes. For presentation, add fresh berries, mint leaves, citrus curls, or a light dusting of sugar.
- Drizzle = slow ribbons; full coverage = thicker, opaque pour.
- Add liquid 1 tablespoon at a time to avoid glaze soup.
- A pinch of salt brings out the vanilla and balances sweetness.
| Glaze Type | Texture | Key measures |
|---|---|---|
| Classic vanilla | Light drizzle | 1 cup powdered sugar, 2–3 tbsp cream, 1 tsp vanilla, pinch salt |
| Butter-based | Thicker, bakery finish | 1 cup powdered sugar, 4 tbsp butter, 1–2 tbsp milk, vanilla |
| Serve ideas | Fresh, bright | berries, mint, citrus curls |
Slice and serve for brunch, holiday centerpiece, or a weekday coffee treat—glazing is the easy way to make each slice feel special.
Troubleshooting Common Pound Cake Problems
If your loaf comes out dense, stuck, or dry, here’s how to fix it fast. I’ll keep this short and practical so you can get back to baking with confidence.
Dense or tight crumb
A dense crumb often starts with rushed creaming, cold ingredients, or overmixing once the flour goes in. I use a stand or hand mixer to cream butter and sugar until pale and airy—about three minutes for most mixers.
Bring eggs and dairy to room temperature first. Stop mixing as soon as the dry ingredients are incorporated to avoid overmixing; if batter feels stiff, you’ve gone too far.
Sticking to the pan
Grease and flour the pan like you mean it, especially in bundt creases. Shortening plus a dusting of flour beats butter-only in long bakes.
Let the loaf rest in the pan for 10–20 minutes until warm, not cold, then invert. Waiting too long lets sugar glue the surface to the pan.
Dry edges and finishing tips
Dry edges usually mean too much time in a hot oven. Use an oven thermometer to check temperature and pull the loaf when a toothpick comes clean or shows moist crumbs.
If the top browns too fast, tent loosely with foil mid-bake. For storage, wrap slices airtight — that storage method keeps the crumb tender for days.
| Problem | Likely causes | Quick fix |
|---|---|---|
| Dense crumb | Insufficient creaming, cold ingredients, overmixing | Cream 3 minutes, use room temperature ingredients, stop when combined |
| Stuck to pan | Insufficient grease/flour, unmolded when cold | Shortening + flour, cool 10–20 minutes, invert while warm |
| Dry edges | Overbaking, oven runs hot | Use thermometer, tent with foil, pull when toothpick comes clean |
Make-Ahead, Storage, and Freezing Tips That Keep It Fresh
Plan ahead and this loaf will reward you later — the crumb really holds up and often tastes even better after a day.
For room storage, wrap the loaf tightly in plastic wrap and place it in an airtight container. Stored this way at room temperature, the cake stays moist for up to a week.
If you prefer the refrigerator, wrap well so the fridge doesn’t dry the crumb or lend odd flavors. Properly wrapped, it keeps about a week there too.
For longer holding, freeze unfrosted when possible. Double-wrap in plastic wrap and foil, pop into an airtight freezer container, label with the date, and keep up to 3 months.
Thaw at room temp for best texture, or warm a slice briefly in the microwave for 10–15 seconds. For detailed freezing and thawing tips, see this handy guide: how to freeze and thaw pound.