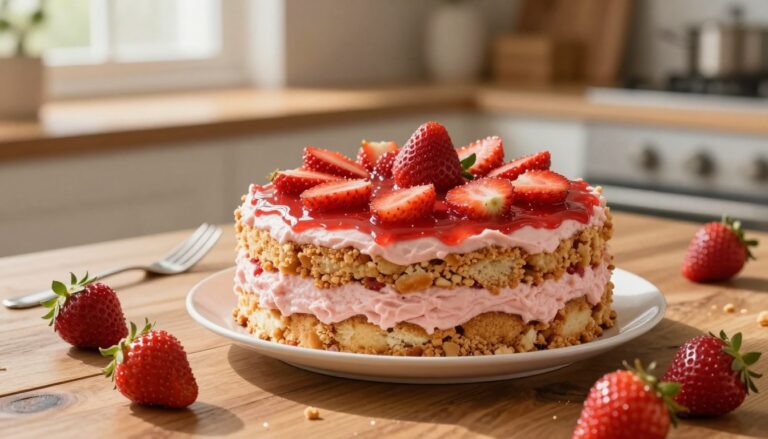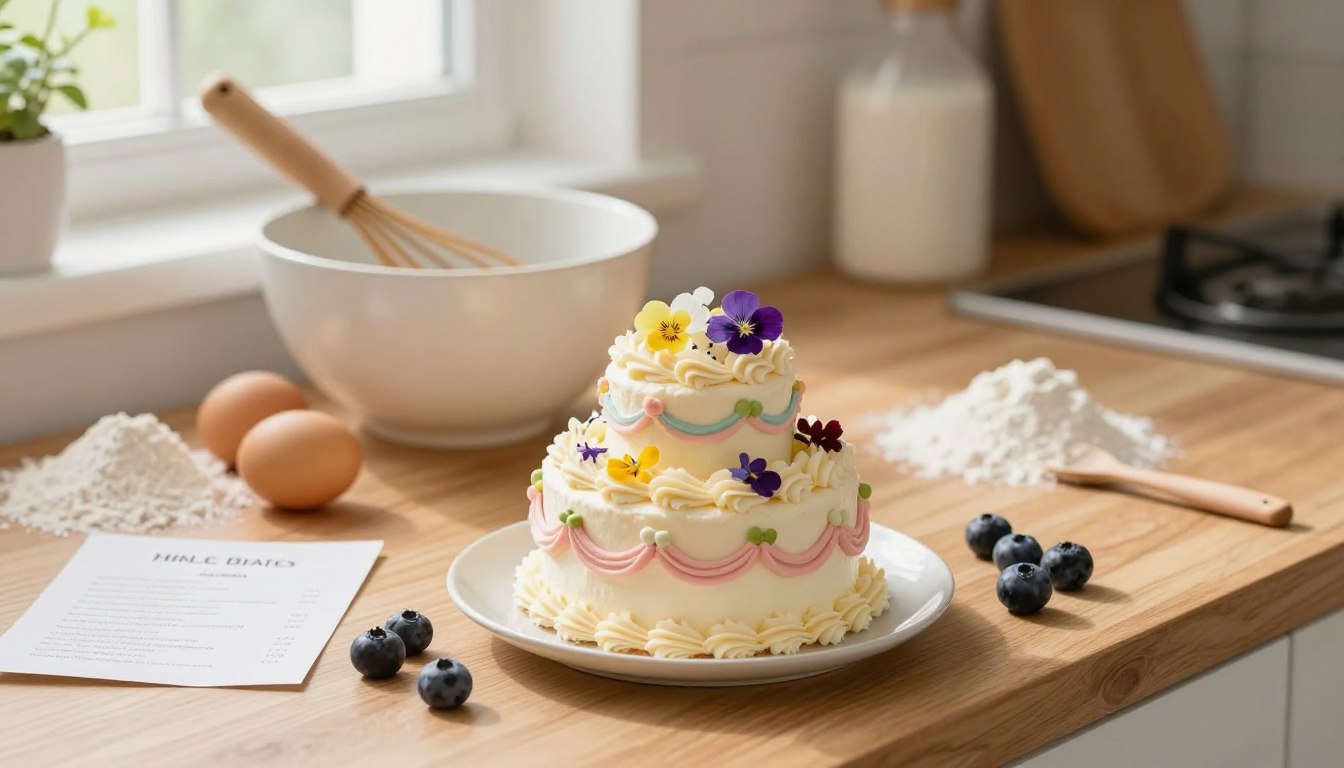
Mini Cake Recipe
I love a small-batch vanilla treat that feels festive without filling the kitchen with leftovers. This is a tiny, high-impact cake you can mix by hand and bake in about 15 minutes of active prep.
The vibe: classic vanilla flavor, plush crumb, and a simple process that still looks bakery-cute when frosted. I aim for reliable results you can trust for birthdays, impromptu guests, or a cozy night in.
Quick method note: I use reverse creaming—mixing fat with flour first, then folding in wet ingredients. It sounds fancy but it’s easy. The result stays tender and moist instead of turning dense or bready.
This is for home bakers who want great flavor without pro gear or a mountain of leftovers. Ahead: pan sizes and yield, tools, ingredients, mixing, baking, cooling, frosting, swaps, and storage—plus timing so you can plan the whole bake.
Why This Mini Vanilla Cake Works for Any Occasion
You don’t need a crowd to enjoy a seriously good vanilla treat with bakery-level texture. I build deep vanilla flavor and a tender crumb into a small batter so it feels like a real celebration cake, not a scaled-down afterthought.
Quick prep and real payoff
Prep takes about 15 minutes: measure, whisk dry ingredients in a bowl, add butter, then combine wet ingredients. You can mix by hand or use a hand mixer or stand mixer—your choice, no fuss.
Why reverse creaming matters
With this method I coat flour with cool butter so gluten is limited. The result is a tight, soft crumb that stays moist for days thanks to a balance of butter, a touch of oil, and buttermilk.
- Keep butter cool to the touch, not greasy.
- Don’t overmix after adding liquids—overworking makes a gummy cake.
- Small batch, big flavor: easy to frost and slice neatly.
Yield, Pan Sizes, and How Much Batter You’ll Have
You’ll be surprised how much usable batter this makes for tall, pretty layers. One full batch fills either three 4-inch rounds or two 6-inch rounds, so plan your pans before you mix.
I recommend the 4-inch pans if you want a taller, show-stopping stack. Two 6-inch pans are easier to find and give a wider, classic look. Either way, the layered cake will feed about eight people when sliced modestly.
- Batch yield: 3 × 4-inch rounds OR 2 × 6-inch rounds.
- Serving guide: layered cake serves about 8 slices.
- Layer height: 4-inch rounds usually rise taller; 6-inch rounds may bake a bit shorter.
- Oven tip: place pans on the middle rack so they bake evenly and avoid a dark bottom.
- Portioning: use a scale or measure by eye to split batter evenly for consistent bake times.
Equipment You’ll Need for Mini Cakes

Good pans and a few tidy tools make the whole process smoother and more fun. Start by choosing light-colored aluminum pans (4-inch or 6-inch rounds) for the most even bake. Dark pans heat faster and can over-brown the edges, so adjust time or lower the oven temperature if that’s all you have.
Best pans for even baking
Light-colored metal, preferably aluminum, gives the most gentle, even heat. Line each pan with parchment and grease the sides so layers release cleanly. I use three 4-inch rounds or two 6-inch rounds depending on the look I want.
Mixing options
You can whisk in a bowl by hand, use a hand mixer, or a stand mixer with the paddle attachment. No judgment—pick what fits your kitchen and mood. The paddle keeps batter airy without overworking it.
Must-haves for clean layers
Parchement paper, an offset spatula for spreading and lifting, and a wire rack to cool layers are essential. Cool fully before leveling to avoid tearing the crumb.
Finishing tools
Grab a bench scraper and an offset spatula for smooth sides. Use a serrated knife to level tops and a toothpick to test doneness—the center should come out with a few moist crumbs.
| Tool | Why it matters | Use | Tip |
|---|---|---|---|
| Light-colored aluminum pan | Even heat, less browning | Baking layers | Lower temp 10°F if using dark pans |
| Stand mixer / hand mixer | Consistent mixing, less effort | Creaming and final batter | Paddle attachment for tender crumb |
| Wire rack & parchment | Proper cooling and release | Cool layers after baking | Flip onto rack, peel parchment gently |
| Knife, toothpick, scraper | Leveling, doneness, smoothing | Finish and check layers | Level when fully cool; test center with toothpick |
Quick workflow: prep pans → mix in a bowl → bake → cool on rack → level with a serrated knife → smooth with bench scraper and offset spatula. Keep tools handy and your counter stays tidy.
Mini Cake Recipe Ingredients (Cake + Vanilla Buttercream)
Here’s a clean ingredient list so you can shop and measure with confidence. I split the items into two groups—cake and buttercream—so mise en place is painless and nothing gets missed.
Dry ingredients
– All-purpose flour: builds structure and crumb. Measure by spooning into the cup or weigh for best accuracy.
– Granulated sugar: sweetens and tenderizes the crumb.
– Baking powder: the lift that keeps small layers airy.
– Salt: sharpens all the flavors so the vanilla pops.
Wet ingredients
– Unsalted butter (melted and cooled) plus a neutral oil for extra moisture and tender shelf life.
– One large egg for structure, room-temperature buttermilk for tang and softness, and vanilla extract or paste for aroma.
Buttercream basics
– Unsalted butter, powdered sugar, vanilla, a pinch of salt, and heavy cream or milk. This makes a spreadable, pipeable frosting you can thin with cream or thicken with more powder.
Room temperature matters: bring butter, egg, and milk to room temperature before mixing. That temperature consistency keeps batter smooth and keeps buttercream from splitting or turning greasy.
| Ingredient Group | Key Items | Role | Measure tip |
|---|---|---|---|
| Cake | Flour, sugar, baking powder, salt | Structure, sweetness, lift, balance | Weigh flour; level cups for sugar |
| Wet | Unsalted butter, oil, egg, buttermilk, vanilla extract | Flavor, moisture, structure, tenderness, aroma | Use room temperature ingredients |
| Buttercream | Butter, powdered sugar, vanilla, heavy cream/milk | Frosting texture: spreadable/pipeable | Add cream tablespoons to adjust consistency |
| Accuracy | Cups vs weight, tablespoons where noted | Consistency in small batches | Prefer grams for repeatable results |
How to Make Mini Cake Batter (Reverse Creaming Method)
Start by getting the oven and pans ready so the rest of the bake feels effortless. Preheat oven to 350°F (175°C). Line each pan with parchment and spray with nonstick spray so layers release cleanly.
Mix dry ingredients first
Whisk flour, sugar, baking powder, and salt together in a large bowl. This evens out the baking powder so the cake rises consistently. Use a sifter or whisk for a light, lump-free mix.
Coat the flour with butter
For reverse creaming, add unsalted butter to the dry mix. You can use melted-and-cooled butter for a one-bowl shortcut or cool butter cubes for a classic method. Either way, coat the flour so gluten stays limited and the crumb stays tender.
Add wet ingredients and finish gently
Whisk egg, buttermilk, vanilla extract, and oil in a separate cup. Fold the wet into the bowl and mix until just combined—stop when streaks disappear. Use a hand, hand mixer, or stand mixer on low. Overmixing makes the batter gummy.
Divide and assess batter
Weigh batter to split evenly between pans for level layers. The batter should be thick but pourable—like a glossy, ribboned batter that settles slowly.
| Step | Temp | Note |
|---|---|---|
| Preheat & prep | 350°F / 175°C | Line pans, spray parchment |
| Dry mix | room temperature | Whisk in a large bowl |
| Butter step | cool or melted | Coat flour to limit gluten |
| Finish | low speed | Mix until just combined |
Bake, Cool, and Level Your Mini Cake Layers

Nailing the bake and cool steps turns ordinary batter into neat, stackable layers that look pro. I’ll walk you through realistic timing, simple doneness tests, and a fast chill trick so your assembly goes smoothly.
Know when they’re done
Bake at 350°F. Expect about 32–35 minutes for most setups, or 30–33 minutes depending on pan and oven quirks. Watch the top: it should look set and not shiny, and spring back lightly when touched.
Use a toothpick in the center—pull it out with a few moist crumbs, not wet batter. That’s the sweet spot for tender cakes that still hold up to frosting.
Cooling routine
Let layers rest in the pan for 10 minutes, then flip onto a wire rack so steam escapes and bottoms don’t get soggy. This short pause keeps structure intact while the interior finishes cooling.
Fast chill and leveling
For easier stacking, pop cooled layers in the freezer for about 20 minutes. Cold layers are firmer and slice cleaner with a serrated knife.
Wait until the cake is fully cool before leveling. Use a long serrated knife and a gentle sawing motion to remove domes and get even layers. Repeat for all cakes so your stack sits flat.
| Step | Time | Why it helps |
|---|---|---|
| Bake at 350°F | 30–35 minutes | Even rise and set top |
| Rest in pan | 10 minutes | Stops shock cooling and steaming |
| Freezer chill | ~20 minutes | Makes leveling and stacking easier |
A well-made vanilla cake stays moist for days, especially after a sealing layer of buttercream. When you follow these steps, decorating is fast and forgiving—promise.
For a visual walkthrough of stacking and trimming, I like this short layer tutorial.
Frosting, Filling, and Decorating Ideas (No Fancy Tools Required)
A good frosting makes a small layer feel special, and you don’t need a pro kit to get there.
I dial in vanilla buttercream texture by working in tiny adjustments: add cream or milk 1 teaspoon at a time to thin, or add powdered sugar in small increments to thicken. Mix until smooth and taste for balance—vanilla sings through best when the butter is bright but not greasy.
Apply a thin crumb coat to trap loose crumbs, then chill the cake about 20 minutes in the fridge or 5 minutes in the freezer. That quick chill sets you up for clean edges and a smooth final layer.
You can decorate without a stand. Use an offset spatula or the back of a spoon for a textured finish, or smooth with a bench scraper for classic sides. For simple tops, pipe swirls (Wilton 1M) or scatter nonpareil sprinkles for instant cheer.
- Color: gel food coloring adds bold hues without thinning the buttercream.
- Filling: extra buttercream, jam, curd, or whipped filling — refrigerate if using curd or dairy.
- Tools: a hand mixer or stand mixer speeds things, but a steady spoon works fine.
| Finish | Tool | Why |
|---|---|---|
| Textured | Spoon/offset spatula | Quick, forgiving, homemade look |
| Smooth | Bench scraper | Polished, bakery-style sides |
| Piped top | Piping bag & tip | Decorative borders and swirls |
Swaps, Dietary Options, and Make-Ahead Storage Tips
Smart substitutions and make-ahead moves mean you can bake now and frost later with calm confidence.
Flour swaps and gluten-free tips
All-purpose flour is the baseline, but cake flour gives a softer crumb. For a gluten-free blend, whisk the batter a bit longer for structure, then let it rest about 30 minutes so the flour hydrates and loses grit.
Dairy and fat alternatives
For buttermilk swaps use full-fat yogurt, sour cream, or whole milk. Almond, soy, or oat milk work too—expect slight changes in tang and texture.
If you use salted butter, skip added salt. Vegan butter can replace unsalted butter; watch consistency since plant-based fat behaves differently at room temperature.
Egg-free and practical swaps
Make an egg-free version with a flax egg or a commercial egg replacer. Both keep structure while staying simple for shared diets.
| Swap | How to adjust | Result | Tip |
|---|---|---|---|
| Cake flour | Use 1:1 or sift into AP flour | Softer crumb | Reduce mixing to avoid collapse |
| Gluten-free blend | Whisk longer, rest 30 min | Better texture, less grit | Hydration is key |
| Dairy alternatives | Yogurt/sour cream/whole or plant milk | Similar moisture, varied tang | Adjust sweetness if tang changes |
| Egg-free | Flax egg or replacer | Holds together, slightly denser | Use a binder for taller rise |
Make-ahead: wrap unfrosted layers tightly and freeze up to 3 months. A frosted cake keeps in the fridge up to a week, or frozen up to a month; leftover frosting lasts about a month refrigerated or 3 months frozen.
Note: this batter isn’t ideal for cupcakes—if you want cupcakes, pick a cupcake-specific version. For similar mini vanilla layers, see mini vanilla layers.
Make It, Share It, and Bake Your Next Mini Celebration Cake
Make a single-bowl batch, frost it fast, and you’ll have a polished centerpiece in under an hour—perfect for birthdays, anniversaries, or a bright random Tuesday.
Quick checklist: prep the pan, whisk dry ingredients in one bowl, follow the reverse creaming method, bake until the top springs and a toothpick shows a few moist crumbs, cool, frost, and decorate.
Top tips: use room temperature ingredients, don’t overmix, and chill layers briefly before stacking for neater frosting. Small flavor tweaks (different extracts, a jam layer, or tinted buttercream) change the mood instantly.
If you try this recipe, leave a rating or comment and share photos—I love seeing your versions. Layers freeze well and buttercream can be re-whipped after thawing, so you can bake ahead and still serve moist, fresh results days later.