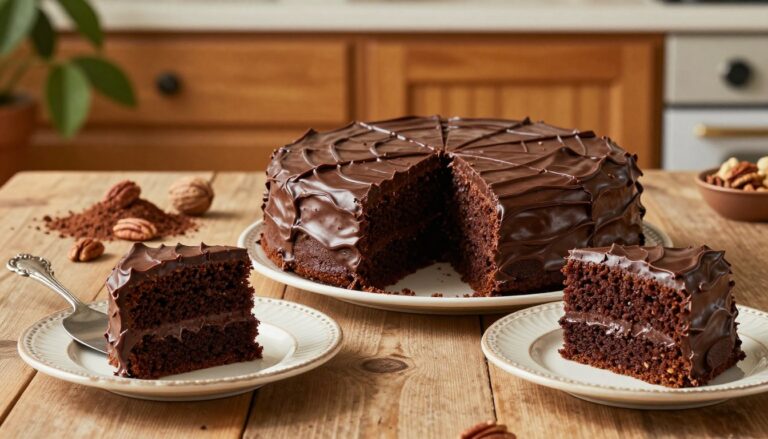
Gluten Free Chocolate Cake Recipe
I’ll set expectations right away: this is my go-to Gluten Free Chocolate Cake Recipe for a moist, rich treat that doesn’t scream “gluten-free.” I test this from-scratch method using pantry staples so you can bake without hunting specialty ingredients.
This is for busy home bakers—birthday parties, weeknight cravings, or when you want a simple layer or a 9×13 to feed a crowd. You don’t need fancy skills; just a bowl, a whisk (or mixer), and some patience.
Quick tease: the hot water trick sounds odd, but it unlocks deep chocolate flavor and keeps the crumb moist. Later I’ll show swaps, pan options, frosting ideas, and fixes for common sink, crumb, or dryness problems.
Read on for a friendly, tested approach that feels bakery-level without the fuss. Let’s make something that disappears fast—seriously fast.
Why This Gluten-Free Chocolate Cake Turns Out Moist and Rich
Let me explain the simple tricks that keep this cake tender and deeply chocolatey. Knowing the why calms you in the kitchen and helps you avoid panicked fixes.
The hot water trick that blooms cocoa powder
Adding boiling hot water to the batter blooms cocoa powder and releases deeper cocoa flavor without extra bars. The heat unlocks aroma and color, so your frosting-free slice still tastes intense.
For gluten baking specifically, hot water also hydrates starches. That reduces grit and gives a softer crumb.
Oil vs. butter for a softer, longer-lasting crumb
Oil keeps the crumb supple for days because it stays liquid at room temperature. Butter tastes great but can firm up as it cools, changing texture.
How baking powder and baking soda create lift and tenderness
Baking powder and baking soda work together: one adds quick lift, the other balances pH and deepens flavor. That teamwork gives a light but still fudgy texture.
- Thinner batter is normal—don’t add extra flour; it bakes fine.
- Boiling water aerates the batter slightly and jump-starts leaveners for a fluffy crumb.
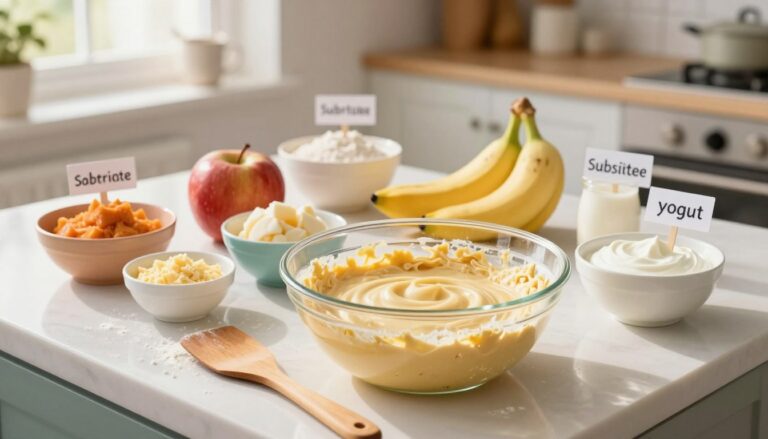
Ingredients You’ll Need (Plus Smart Substitutions)
Here’s a clear list of pantry essentials and sensible swaps so you can bake with confidence. I name brands and choices I use so you don’t have to guess at the store.
Best flour blends (with xanthan gum)
I trust King Arthur Measure-for-Measure and Bob’s Red Mill 1:1 for consistent results. Cup4Cup works well too (note some blends contain milk powder).
Which cocoa powder to pick
Natural cocoa gives tang; Dutch-processed tastes smoother and often richer. Either will work—just match your leavening if using Dutch.
- Milk: dairy, almond, or oat milk all substitute easily—expect slight flavor changes.
- Eggs and vanilla extract: use large eggs at room temperature for an even batter and better rise.
- Optional: a teaspoon of instant coffee or espresso powder sharpens chocolate flavor without tasting like coffee.
| Item | Why it matters | Swap |
|---|---|---|
| Flour blend | Structure; xanthan gum prevents crumbling | Use 1:1 blends or add xanthan if missing |
| Cocoa powder | Depth of flavor | Natural or Dutch |
| Milk | Liquids for batter | Dairy or almond/oat |
Tools and Prep for Stress-Free Baking
Before you preheat, let’s set up the pans and tricks that save you time and tears. A little prep makes the bake smoother and the results prettier.
Choosing your pan layout
I use either two 9-inch round pans for a layered look or a single 9×13 sheet for easy serving. Layers bring the party vibe; a 9×13 gives maximum cake with minimal fuss.
Parchment paper + spray: no-stick insurance
Prep each pan by spraying the base lightly, then press in a parchment round or a parchment-lined base, and spray again on top. That double layer keeps edges intact and makes removal simple.
- Why this matters: gluten-sensitive batters can cling more, so good prep saves your crumb and your patience.
- Rack placement: center rack is your best friend for even heat and a flat top.
- Oven temperature: bake at 350°F and avoid opening the door early to keep rise steady.
- Optional: cake strips help layers bake more evenly but are not required.
| Option | Use | Result |
|---|---|---|
| Two 9-inch pans | Layered celebration | Even layers, classic look |
| 9×13 pan | Sheet cake / feed a crowd | Quick, more servings |
| Parchment + spray | Non-stick setup | Clean release, tidy edges |
Quick Recipe Snapshot for Busy Bakers

For busy bakers, here’s a tight timeline and simple steps to get you from bowl to oven without drama.
Prep time: 10 minutes. Bake time: layers 30–35 minutes; 9×13 pans 45–50 minutes (some recipes fit between 35–40 minutes). Total time: about 60–75 minutes including cooling.
Pan choice changes timing: two 9-inch rounds bake faster and give neat layers. A 9×13 takes longer but feeds a crowd and is lower fuss.
- Whisk dry ingredients in a bowl until even.
- Add wet ingredients and mix until smooth (whisk or mixer works).
- Slowly stream in boiling water, stir to a thin, pourable batter.
- Pour into prepared pans and bake until a toothpick shows moist crumbs.
Equipment note: a whisk is fine for a small batch; a mixer speeds things up and gives a silkier crumb for larger volumes.
| Pan | Typical Bake Minutes | Result |
|---|---|---|
| Two 9-inch rounds | 30–35 | Even layers, quick finish |
| 9×13 pan | 45–50 | More servings, thicker slab |
| Deeper single pan | 35–40 | Varies by volume; check doneness |
Final tip: cool completely before frosting—patience here keeps your frosting from sliding and gives tidy layers. Now go enjoy the baking—and the applause.
How to Make the Batter (No-Fail Method)
Start by setting up one large bowl and your confidence—this batter is forgiving if you follow the order. I’ll walk you through the exact sequence so you don’t chase flour pockets or end up with lumps.
Mix the dry ingredients
Whisk together the flour, sugar, cocoa powder, baking powder, baking soda, and salt in a large bowl. Use a whisk until the mix looks uniform and airy—this avoids dense spots later.
Add the wet ingredients
Stir in milk, oil, large eggs, and vanilla extract until smooth. Room-temperature eggs blend faster and give a steady rise, so avoid using fridge-cold eggs if you can.
Stream in hot liquid
With the mixer on low (or using a whisk), slowly stream in boiling water or hot coffee. Pouring gradually keeps the batter glossy and lump-free instead of splashing or seizing.
Mixing time and final notes
After the hot water is added, increase speed and mix on high about one minute for a silky batter (2–3 minutes if your method calls for longer). Pause once to scrape the bowl and fold any streaks in.
- Measure first—use cups and a teaspoon for precision.
- Don’t cut sugar drastically; less sugar can dry the crumb.
- If whisking by hand, mix a little longer to fully hydrate the powder blends.
| Step | Tool | Why it matters |
|---|---|---|
| Dry mix | Bowl & whisk | Even leavening and salt distribution for balanced flavor |
| Wet add | Spoon or pour | Gentle combining prevents overworking gluten-free batters |
| Hot liquid | Mixer or whisk | Blooms cocoa and creates a smooth, pourable batter |
Bake Times, Oven Temperature, and Doneness Checks
A reliable oven and the right rack position do half the work for a flat, tender top.
Oven setup and ideal temperature
Preheat to 350°F and place a rack in the center. That temperature gives steady rise and even browning.
How many minutes to bake
Two 9-inch pans usually need about 30–35 minutes. A 9×13 pan often takes 45–50 minutes, though shallower batters may finish in 35–40 minutes.
Toothpick test like a pro
Insert a toothpick into the center. It should either come clean or show moist crumbs — not wet batter. That tells you the middle is set.
Preventing sunken centers and wrinkly tops
Let the batter rest in the pan 10 minutes before baking; this helps the structure set. If unsure, turn the oven off and let the pan sit 1–2 minutes before removing.
| Item | Oven/Temperature | Typical Minutes |
|---|---|---|
| Two 9-inch pans | 350°F, center rack | 30–35 |
| 9×13 pan | 350°F, center rack | 45–50 (35–40 if shallow) |
| Doneness check | Toothpick in center | Comes clean or moist crumbs — no wet batter |
Cooling and Leveling for Perfect Layers
Cooling well makes the difference between tidy slices and a frosting fiasco. Start with a short rest in the pan so the crumb sets, then move the rounds to a wire rack to cool completely before you touch the icing.
From pan to rack: quick timing tips
Let pans sit on the counter for about 5–10 minutes. This brief pause prevents the center from collapsing when you turn them out.
Then unmold and place each layer on a rack. Leave them until they cool completely; warm layers plus buttercream equal sliding and sad edges.
Leveling and handling very moist layers
For super-moist cakes, lift with a square of parchment under the layer so the edges move without tearing. I do this when the crumb feels soft but set.
- Use a serrated knife and a gentle sawing motion to level tops.
- Check the center by touch—no warmth means proper cooling.
- Chill briefly if layers still seem floppy before stacking.
| Step | Why it matters | Timing |
|---|---|---|
| Rest in pan | Stops collapse | 5–10 minutes |
| Cool on rack | Prevents soggy sides, sets texture | Until cool completely |
| Leveling | Stable, clean stack | Saw with serrated knife |
For more layer cake tips, see my detailed guide: layer cake tips.
Frosting Ideas That Pair Beautifully With Chocolate Cake

Pick a frosting that matches the mood—rich, bright, or lightly sweet. I’ll walk you through go-to finishes and a few playful upgrades that make every slice sing.
Chocolate buttercream: fluffy and deeply flavorful
For an all-chocolate finish, beat room-temperature butter until creamy. Add powdered sugar and cocoa (use the powder that suits your taste), then loosen with a splash of cream or milk until spreadable.
Adjust thickness by adding more sugar to stiffen or a teaspoon of milk to soften.
Vanilla buttercream & lighter options
Vanilla buttercream keeps a clean black-and-white look—classic and crowd-pleasing.
Ganache gives a glossy, dramatic shell; whipped cream keeps things airy and less sweet. Cream cheese or sour cream frostings add tang and balance rich layers.
Peppermint upgrade
For a celebration twist, swirl peppermint buttercream over a ganache drip for an Andes-mint vibe. It’s showy and simple.
- Vibe: all-chocolate — chocolate buttercream or ganache
- Vibe: classic contrast — vanilla buttercream
- Vibe: tangy balance — cream cheese or sour cream frosting
| Frosting | Texture | Best use |
|---|---|---|
| Chocolate buttercream | Rich, fluffy | Layered cakes, bold flavor |
| Vanilla buttercream | Smooth, classic | Contrast and clean look |
| Ganache / Whipped cream | Glossy or light | Elegant finish or lighter slices |
Final tip: always frost only after layers are fully cool. Warm cakes make frostings slide—and nobody wants that at the party.
Easy Variations: Cupcakes, Sheet Cake, and Celebration Styles
You can easily scale this batter down for cupcakes or up for a sheet pan without changing the core method. The same wet-to-dry balance works; only timing and pan fill change.
Turn the batter into cupcakes
Fill liners about two-thirds full and bake 18–22 minutes at 350°F. Watch for domes that spring back. Cupcakes are perfect for parties and lunchboxes.
9×13 sheet cake for a crowd
Grease a 9×13 pan and pour batter to about two-thirds full. Bake at 350°F for 45–50 minutes depending on batter depth. Let cool before slicing to avoid tears.
Dairy-free swaps that still taste indulgent
Use almond or oat milk, dairy-free butter, and a dairy-free sour cream or a milk+vinegar mix to mimic buttermilk. Check flour blends for milk powder so your dairy-free plan stays true.
- Frosting: use dairy-free butter and non-dairy milk for a smooth finish.
- Serving: clean cuts with a warmed knife yield neat slices; 12–16 portions from a 9×13 depending on size.
- Styling: sprinkles, ganache drip, curls, or peppermint accents make a celebration look showy with little effort.
| Format | Bake Minutes | Pan Fill | Best Use |
|---|---|---|---|
| Cupcakes | 18–22 | 2/3 full liners | Party favors, lunchboxes |
| 9×13 sheet | 45–50 | 2/3 full | Feed a crowd, low fuss |
| Dairy-free version | Same as above | Same | Allergy-friendly celebrations |
Troubleshooting: Fixes for Common Gluten-Free Cake Issues
Don’t panic—grit, dryness, and crumbly layers all have simple causes and fixes. I’ll walk you through quick, practical steps so your next bake surprises you in a good way.
Gritty texture
Grit usually starts with the flour blend. Some blends need a touch more hydration.
Stirring in boiling hot water—or very hot water—helps hydrate starches and smooth the crumb. Let the batter rest briefly so the starches absorb fully.
Dry cake
Too little sugar and too much bake time dry things out. Follow minutes closely and test for doneness early.
Also, refrigeration can sap moisture from gluten free cakes. Serve at room temperature for best flavor.
Crumbly layers and sinking centers
Overmixing, undermixing, and slicing before layers cool can make crumbs fall apart. Let layers cool completely before leveling or stacking.
A 10-minute rest of the batter in the pan and a proper doneness check prevent a sunken center or wrinkly top.
| Issue | Likely cause | Quick fix |
|---|---|---|
| Gritty texture | Flour blend not fully hydrated | Use hot water, stir and rest batter 5–10 minutes |
| Dry cake | Low sugar or overbaking | Watch bake time, test early, serve at room temp |
| Crumbly layers | Mixing and cooling mistakes | Mix gently, cool completely, chill briefly if needed |
| Sunk center / wrinkly top | Underbaked center or rapid cooling | Check with toothpick, rest batter 10 minutes before baking |
Make-Ahead, Storing, and Freezing Tips for the Best Texture
With a little planning you can bake ahead without losing that soft, tender crumb. I aim to bake within 24 hours of serving for peak texture. Some unfrosted versions hold well up to 48 hours if wrapped tightly at room temperature.
If you need longer storage, freeze unfrosted layers: wrap each layer in plastic, slide into a heavy-duty freezer bag, and freeze up to 3 months. Thaw while still wrapped at room temperature for about 1 hour before unwrapping and stacking.
For a frosted cake, set the frosting first by chilling or briefly freezing uncovered. Then wrap snugly with plastic and foil and freeze up to 3 months. When ready, thaw overnight in the fridge, then bring the whole cake to room temperature for 5–6 hours for the best flavor and cream texture.
- Leftovers: store airtight; if refrigerated for food-safety, let slices sit in the room for 30–60 minutes before serving.
- Timing tip: plan your bake time so layers are fresh within 24 hours when possible.
| Method | How | Best for |
|---|---|---|
| Room hold | Wrap tightly, keep in cool room | Serve within 24–48 hours |
| Freeze unfrosted | Plastic wrap + freezer bag, freeze up to 3 months | Prep layers ahead (thaw ~1 hour at room) |
| Freeze frosted | Freeze uncovered to set, then wrap with plastic + foil; thaw in fridge overnight | Longer storage without ruining frosting |
Want more make-ahead ideas and a full walkthrough? See my tested notes at the full guide.
Grab Your Fork and Bake This Gluten-Free Chocolate Cake Anytime
Make this anytime — it’s an easy crowd-pleaser that holds up to busy schedules. I love how hot water (or hot coffee) blooms cocoa powder and lifts flavor while smoothing the batter.
Big three to remember: a good flour blend, that hot liquid trick, and don’t overbake (350°F is your friend). Prep each pan with parchment and spray, mix in a bowl or use a mixer until smooth, and trust the minutes while you check the center.
Choose your format: layered for birthdays, a 9×13 for potlucks, or cupcakes for grab-and-go treats. Play with frosting and toppings — buttercream, ganache, or a peppermint twist — then let the cake come to room temperature before slicing. Grab a fork and enjoy.