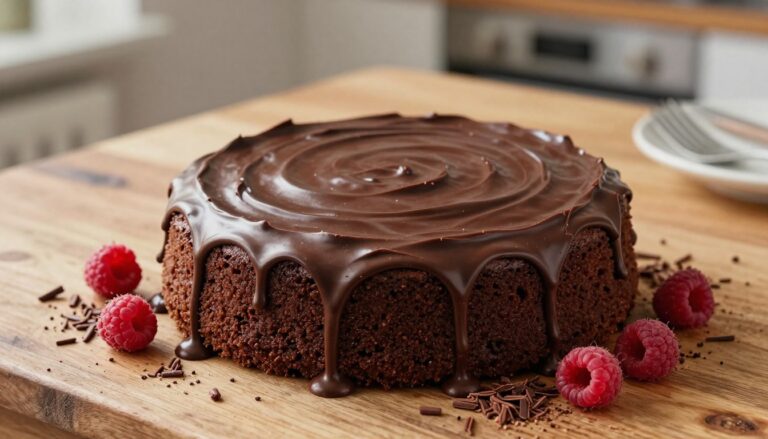
Chocolate Pound Cake Recipe
I’m sharing a true, old-fashioned Chocolate Pound Cake Recipe that bakes dense (in the best way), plush, and unapologetically chocolatey—like a bakery treat without the stress. Prep takes about 15–20 minutes, and the oven sits at 325°F whether you choose a 10-inch Bundt (roughly 16 servings) or a single 9×5 loaf.
This is pound cake, not a fluffy layer cake, so expect a rich, tight crumb that slices clean and looks fancy even in sweatpants. It stays fresh at room temp for up to three days and freezes well for about two months.
I built this for beginners and busy bakers who want big flavor with pantry-friendly steps. Later you’ll see flavor boosters like brewed coffee, cocoa, and a buttermilk option that deepen the profile beyond simple sweetness.
Serve it plain, dusted, glazed, or frosted. If you want to jump ahead, the post maps ingredients → tools → mixing method → bake + cool → toppings → storage → variations.
Why You’ll Love This Moist, Rich Chocolate Pound Cake
Think deep cocoa flavor wrapped in a butter-forward, sturdy-yet-tender crumb. I designed this loaf to feel dense and plush at once—clean slices that still melt on your tongue.
Dense, velvety crumb with deep cocoa and buttery flavor
The cocoa gives real depth without hiding butter and sugar notes. The result is a rich slice that tastes grown-up and comforting.
Beginner-friendly prep with pantry staples
You don’t need fancy tools or rare ingredients. Simple creaming, measured folds, and an oven timer are all it takes.
Perfect for birthdays, holidays, or an anytime craving
This loaf shines at celebrations—birthdays, anniversaries, Valentine’s Day—or on a random Tuesday when you want a showstopper. Want a twist? Fold in 3/4 cup mini chips like a reader suggested.
- Tip: use room temperature butter and eggs for a finer, even crumb.
- Tip: look for clear doneness cues—tester comes out clean or with a few moist crumbs.
Ingredients You’ll Need for a Classic Pound Cake
Gather pantry staples and a few optional boosters so the bake goes smoothly. I list exact measures for the Bundt and note quick swaps if you want a loaf version.
Dry essentials
All-purpose flour, cocoa powder, baking powder, and salt form the base. Sift the dry mix—cocoa loves to clump and sifting keeps the batter lump-free.
- Bundt: 2 cups all-purpose flour, 3/4 cup Dutch-process or unsweetened cocoa powder, 1/2 tsp baking powder, 1 tsp salt.
- Loaf note: use 1 cup flour and bloom cocoa with 2/3 cup boiling water for a denser loaf.
Wet basics and boosters
Butter, sugar, eggs, and vanilla extract build flavor and structure. Butter for richness, sugar for tenderness, eggs for lift and hold, vanilla for that bakery background note.
Moisture boosters: 1 cup buttermilk (or make a quick substitute: 1 cup milk + 1 tbsp lemon juice or vinegar). Sour cream also works for extra plush texture.
Flavor enhancers
A splash of brewed coffee or a pinch of instant granules deepens chocolate without adding a coffee taste. Measure carefully—this recipe rewards precise cups and teaspoons.
| Item | Role | Typical Measure | Best Use |
|---|---|---|---|
| Dutch-process cocoa | Smoother, mellow flavor | 3/4 cup (Bundt) | When you want a rounded, less acidic note |
| Unsweetened cocoa | Brighter, punchy chocolate | 3/4 cup (Bundt) | Works well if you like sharper cocoa impact |
| Buttermilk / Milk + lemon | Tender crumb, gentle tang | 1 cup buttermilk or 1 cup milk + 1 tbsp lemon | Use for moistness and stability |
| Sour cream | Extra richness and softness | Use 1/2 to 1 cup in place of some buttermilk | For ultra-plush slices |
Tools and Pan Prep for a Smooth Release
A smart pan choice and careful prep are the secret to a clean release and even bake. Pick the shape that matches how you want to serve the loaf and how much attention you have to give it while it bakes.
Bundt, tube, or loaf — pick what fits
I recommend a 10-inch Bundt for a showstopping slice, a 10-inch tube pan for classic, old-school shape, or a 9×5 loaf pan lined with parchment for easy transport and neat slices. Pan depth affects bake time: deeper pans usually need more oven time so the center finishes without drying the edges.
Prep and release tips
Grease every nook and then dust with flour—this is crucial for fluted pans where batter clings. For loaf pans, spread softened butter and add a parchment sling; it makes removal drama-free.
Helpful basics
Have a couple mixing bowls, a mixer (hand or stand), accurate measuring cups and spoons, and a cooling rack ready. Cool in the pan for 10–20 minutes, then invert to the rack to finish cooling so the crumb won’t steam and get soggy.
Chocolate Pound Cake Recipe: Step-by-Step Mixing Method

Start by bringing your butter and eggs to room temperature — it’s the single easiest trick for a smooth batter. Cold ingredients fight each other and make lumps, so plan 30–60 minutes at counter temperature.
Prep the dry mix
In a bowl, sift flour, cocoa powder, baking powder, and salt together. Sifting prevents bitter pockets and keeps the chocolate flavor even.
Cream, add, alternate
Cream softened butter and sugar until light and slightly pale. Add eggs one at a time so the mix doesn’t split, then stir in vanilla extract and coffee (a teaspoon of instant or a splash of brewed coffee).
- Mix a bit of dry, then buttermilk, then dry again; repeat. This alternating method avoids overmixing and keeps the crumb tender.
- Stop as soon as you don’t see dry streaks — that’s your cue to quit mixing.
- Pour batter into the prepared pan and tap the pan on the counter to release trapped air bubbles.
| Step | Quick cue |
|---|---|
| Creaming | Color lightens, texture airy |
| Eggs | Add one at a time |
| Final mix | No visible flour streaks |
Optional: fold in 3/4 cup mini chips for texture. These small choices help you make chocolate pound loaves that look and taste like a pro made them.
Baking at Oven 325°F: Time, Doneness, and Cooling
Set your oven to 325°F and plan for a longer, gentler bake—this pays off in texture. Low heat helps the loaf cook through without drying the edges, so trust the minutes rather than the clock alone.
Typical bake times by pan
Here are reliable ranges so you can plan your day:
- Bundt pans: about 60–70 minutes.
- 9×5 loaf pans: about 70–80 minutes.
- Deep tube pans: up to 90 minutes depending on depth.
How to tell it’s done
Insert a toothpick, cake tester, or wooden skewer into the center. If it comes out clean (or with a few moist crumbs) the bake is ready.
Visual cues help too: the top should look set, the loaf may pull slightly from the pan edges, and a natural crack down the middle is normal and charming.
Cooling like a pro
Let the loaf cool in the pan for 10–20 minutes so it firms up. Then invert onto a wire rack and let it finish cooling so the cake cools evenly and won’t steam.
If it sticks, loosen gently with a thin spatula, be patient, and next time grease and flour fluted pans thoroughly.
Toppings and Serving Ideas for an Extra-Decadent Dessert

A few smart finishes can turn a simple loaf into an unforgettable dessert in minutes. Below are quick, reliable options that add shine, flavor, and a touch of cake-shop polish without fuss.
Simple dusting to highlight the top
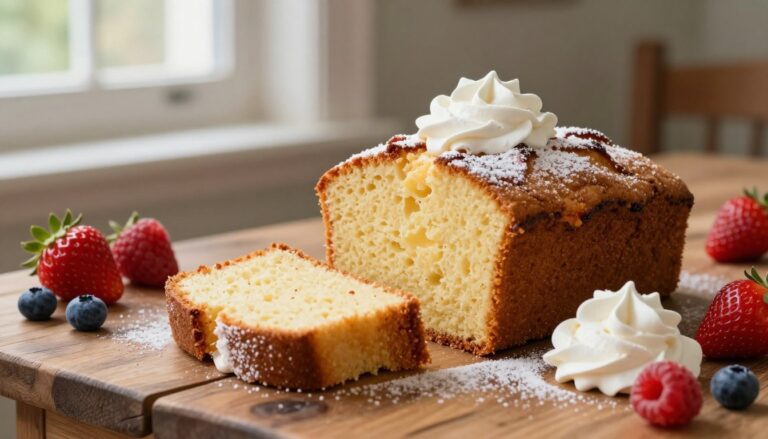
For the easiest win, sift a light layer of powdered sugar over the loaf. It looks elegant and lets the loaf’s texture and cocoa notes show through.
Classic frosting from cocoa powder
Want a bakery-style finish? Whip a quick frosting using sifted cocoa powder, room-temperature butter, powdered sugar, and a splash of vanilla extract. Spread while slightly warm for a smooth look that still holds shape.
Easy glossy glaze
Make a shiny drizzle by warming chopped chocolate with a little milk and vanilla extract until smooth. Cool briefly, then pour so it sets glossy and neat on the surface.
Upgrade ideas: ganache, caramel, berries
For pure decadence, use a ganache glaze (heavy cream + chocolate). Try a spiced-rum caramel sauce for warmth and depth. For brightness, macerate berries: 4 cups berries + 1/2 cup sugar, rest about 45 minutes, stir occasionally, then spoon over slices.
Serving and timing tips
Serve warm slice + scoop of vanilla ice cream for an easy plated dessert. Glaze only when the loaf is cool so it won’t soak in. Slice with a sharp knife for clean edges and use a gentle sawing motion.
Storage, Freezing, and Make-Ahead Tips
A little planning on storage and freezing means you can enjoy perfect slices for days to come. Follow a few easy steps and your loaf will stay moist and ready when guests arrive or when you want a quick sweet bite.
How to store at room temperature for several days
Cool the loaf completely. Wrap it tightly in plastic wrap or place it in an airtight container to keep the crumb from drying out.
On the counter, the loaf keeps best for about 3–4 days depending on kitchen humidity and temperature.
When refrigeration helps
If your house runs warm or you’ve added perishable frosting, move the wrapped loaf to the fridge. Refrigeration can add a few extra days of freshness.
Let chilled slices come to room temperature before serving for the best texture and flavor.
Freezer instructions (up to two months)
Wrap the whole loaf or individual slices tightly in plastic, then in foil. Label with the date and freeze for up to two months.
Thaw wrapped at room temperature—this takes a few hours for slices and a few hours to overnight for a whole loaf.
- Bake the day before a party, cool fully, wrap overnight, then glaze or frost the next day.
- Pre-slice before freezing for quick, grab‑and‑go portions.
| Storage Method | Where | How Long |
|---|---|---|
| Wrapped/airtight | Room temp | 3–4 days |
| Wrapped | Refrigerator | Up to a week (check frosting) |
| Double-wrapped | Freezer | Up to 2 months |
Your Next Slice: Variations and Bake-Day Notes to Keep Handy
A few smart tweaks—mini chips, a splash of coffee, or a little brown sugar—will change the loaf’s mood fast.
Bloom cocoa with boiling water for an extra-deep flavor when you make a loaf. Swap Dutch-process for unsweetened to change acidity and bite. Add 3/4 cup mini chips if you want texture.
Pan swaps matter: Bundt shows off shape, loafs bake a touch longer, and tube pans need more time for a set center. I always start checking doneness a few minutes early.
On my sticky note: don’t overmix, scrape the bowl, measure carefully, and trust the tester. If the top cracks, relax—it’s normal. Dry? You likely overbaked. Sinked center? Try a gentler mix or longer bake.
For another method and loaf-style tips see the chocolate bread method. Pick your next slice—simple or fully decadent—and enjoy baking history (this style dates back to the 1700s!).