Bisquick Coffee Cake Recipe
I love a weekend that starts with warm baking and a thick streusel topping. This bisquick coffee cake is a semi-homemade shortcut that delivers tender crumb, bold cinnamon, and a craveable crumb layer without an all-day commitment.
Think: preheat oven, mix the batter in one bowl, stir the topping separately, sprinkle generously, and bake until golden. The topping is meant to be hefty (yes, it looks like a lot — that’s the point).
Key wins here are simple: measure the mix right, don’t overmix the batter, and use the right pan so the cake rises tall but stays moist. Butter and sugar in the streusel give that bakery hit every time.
Serve it for breakfast, bring it to brunch, or slice for an afternoon treat. Want to tweak it? Add more cinnamon, fold in nuts or fruit, or dust with powdered sugar — the base is forgiving and easy to make your own.
Why This Bisquick Coffee Cake Belongs in Your Breakfast Rotation
This version earns a spot in my breakfast lineup because it’s quick, comforting, and reliably delicious.
I lean on the mix for one big reason: it already has leavening and a forgiving texture. That means a tall, tender crumb without a lot of measuring or extra bowls.
The flavor hits what you expect from a classic coffee cake — soft cake, warm cinnamon, and a sweet, crunchy top. No stand mixer needed; just simple stirring and a generous streusel topping that bakes up crisp and cozy.
Timing is flexible. It works as a quick weekday treat and also shines at holiday mornings or last-minute brunches. Bake it ahead, cover it, and it keeps well for the next day.
- Minimal prep, big bakery-style results.
- Thick streusel gives the best texture contrast.
- Easy to slice and share — true crowd-pleaser.
One small reality check: the base is pleasantly sweet, but you can add a glaze if you want more shine. Either way, this is a dependable pick for breakfast, coffee breaks, and anytime someone asks for a warm, homey dessert.
Bisquick Coffee Cake Recipe Ingredients You’ll Need

Start by collecting the essentials so mixing goes fast and the texture turns out right. I list core ingredients, explain their jobs, and point out smart swaps.
Cake batter essentials
You’ll need baking mix, milk (whole or buttermilk), eggs, sugar, and vanilla extract. The baking mix provides leavening and structure, milk adds fat and tenderness, and eggs bind the batter while adding lift.
Optional flavor boost
Stir in a little ground cinnamon to the batter for a warm, all-through spice rather than just on top. It’s optional but lovely.
Streusel topping & moisture upgrades
For the streusel topping use brown sugar, butter, a bit of baking mix, and cinnamon—pack the brown sugar when measuring. For a moister crumb, fold in a few tablespoons of sour cream or Greek yogurt before baking.
| Pan | Size | Notes |
|---|---|---|
| Square | 8″ or 9″ | Taller cake; check a few minutes earlier for doneness |
| Pie plate | Deep pie | Shallower bake; reduce time slightly |
Key Prep Notes Before You Preheat Oven
Don’t rush to preheat oven—first do a few little things that keep the crumb soft and even. A tiny bit of prep now saves you from a dry or dense loaf later.
How to measure Bisquick correctly
Measuring this baking mix like flour is the single biggest trick. Stir or fluff the canister, then either spoon into your measuring cup and level with a knife, or scoop into a small bowl and transfer, leveling off the top. Don’t scoop straight from the box and pack the cup.
Choosing milk for a moister crumb
Whole milk adds richness because of the extra fat. Buttermilk brings a touch of tang and extra moisture for a softer bite.
- Whole milk = richer, slightly denser crumb.
- Buttermilk = tangy, very tender texture.
Room temperature eggs for an even batter
Use room temperature eggs so they blend faster and your batter becomes well combined with less stirring. That reduces the risk of overmixing and a tough cake.
Prep your pan before you mix: spray or line it so once the batter is ready it goes straight into the oven. If your bakes run dry, check two things—overmeasuring the mix (packed cup) or overbaking. Small fixes, big difference.
| Prep Step | Why it matters | Quick tip |
|---|---|---|
| Measure mix properly | Prevents dense, dry crumb | Spoon/level or fluff then scoop |
| Choose milk | Adds fat and moisture | Whole for richness, buttermilk for tang |
| Room temperature eggs | Blend easily; batter mixes smoothly | Leave eggs out 20–30 minutes |
How to Make Bisquick Coffee Cake Batter in One Bowl
Making the batter in one bowl keeps things tidy and gives a tender crumb with minimal fuss. I use a simple order: wet ingredients first, then the dry mix. That little step helps everything come together fast without overworking the batter.
Mixing method for a thick batter without overworking it
Whisk eggs, milk, melted butter, vanilla, and any sugar until smooth. Add the baking mix in two additions and stir with a spatula. Stop when you don’t see dry streaks—just well combined. The batter should be thick and spreadable, not pourable like pancake batter.
Pan prep tips: nonstick spray, parchment paper, and the right pan height
Spray your pan and, if you want clean slices, line the bottom with parchment so you can lift the whole cake out. Use an 8×8 at least 2 inches deep for a tall rise. A 9×9 or a deep-dish pie plate works fine if your pan is shallower.
- Scrape the bowl—fold the bits into the batter before stopping.
- Don’t beat aggressively; gentle stirs keep the crumb tender.
- If baking in a pie dish, expect a slightly shorter bake time.
| Pan Type | Depth | Result |
|---|---|---|
| 8×8 square | 2″+ | Taller cake, moist center |
| 9×9 square | 1.5–2″ | Even rise, slightly shorter bake |
| Deep-dish pie plate | 2″ deep | Shallow, rustic look; set for serving |
| Notes | Pan prep | Spray or parchment for easy release |
Bake until the center springs back and a toothpick comes clean. That’s your cue—cool a few minutes, then slice and enjoy.
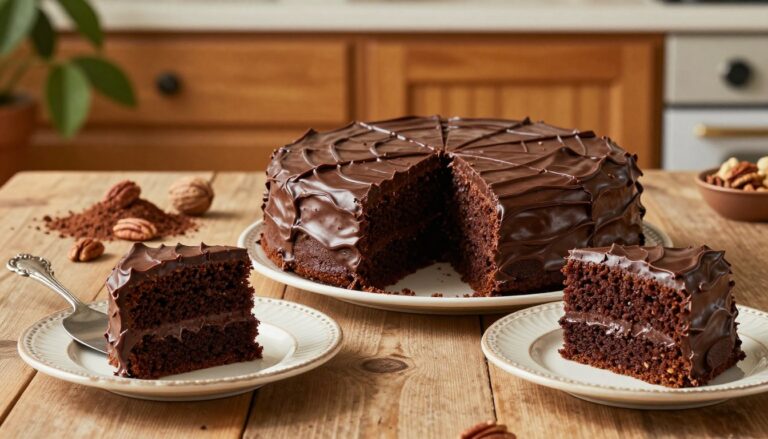
Streusel Topping: Getting Big Crumbs and That Bakery-Style Top
Nail the streusel and you’ll get crunchy pockets of cinnamon and brown sugar on every slice. I like a bold streusel topping that stays chunky and bakes crisp instead of melting into the batter.
Use melted butter for quick, cohesive clumps. Use cold butter (cut into cubes) if you want big pebble-like crumbs that shout “bakery.” Both work; cold butter keeps texture dramatic.
Mix the streusel in a separate bowl. Stir until you see large crumb balls form. Stop before it smooths out—those clumps are what give the top its showstopping crumb.
For a cinnamon ribbon, layer half the batter, half the streusel, then repeat. This creates a hidden swirl in each slice and easy cinnamon pockets.
Finishing options: dust with powdered sugar, drizzle a simple vanilla glaze, or go rich with a thin cream cheese drizzle. Add-ins that work: chopped pecans, walnuts, blueberries, or chocolate chips. Sprinkle evenly, press a few crumbs into the top, and leave some big chunks for drama.
| Method | Butter | Texture | Best for |
|---|---|---|---|
| Quick mix | Melted butter | Small clumps, cohesive | Even coverage, less prep time |
| Chunky crumbs | Cold butter | Large pebble-like crumbs | Bakery-style, dramatic top |
| Mixing tip | Separate bowl | Crumb balls form | Stop when clumps appear |
Baking Time, Pan Sizes, and How to Know It’s Done

The difference between a moist center and a dry one often comes down to minutes and pan size. I break down common pans and realistic minute ranges so you aren’t guessing while the oven hums.
8×8, 9×9, pie plate, and 9×13 adjustments
An 8×8 or 9×9 usually bakes taller and needs more time. Expect about 45–50 minutes at 350°F for a thicker 8×8. A deep pie plate gives a pretty, shallow loaf and often lands between the two.
A 9×13 spreads thinner and bakes faster. At 375°F plan roughly 35–40 minutes there. For smaller 8-inch pans at 375°F, watch around 20–22 minutes.
Temperature and minutes: 350°F vs 375°F
Lower temps give a gentler bake and even crumb. Higher temps brown the top sooner and cut minutes, but they can rush the edges.
Doneness checks you can trust
Look for a golden top and set edges. Press the center—if it springs back, that’s a good sign. Insert a toothpick in the middle; it should come clean or with a few moist crumbs.
| Pan | Oven Temp | Minutes | What to look for |
|---|---|---|---|
| 8×8 or 9×9 | 350°F | 45–50 | Golden top, center springs back, toothpick comes clean |
| 8″ at 375°F | 375°F | 20–22 | Browned top fast; check early to avoid dryness |
| 9×13 | 375°F | 35–40 | Even color, set edges, test center with toothpick |
| Deep pie plate | 350–375°F | 30–45 | Shallower rise; watch minutes and test center |
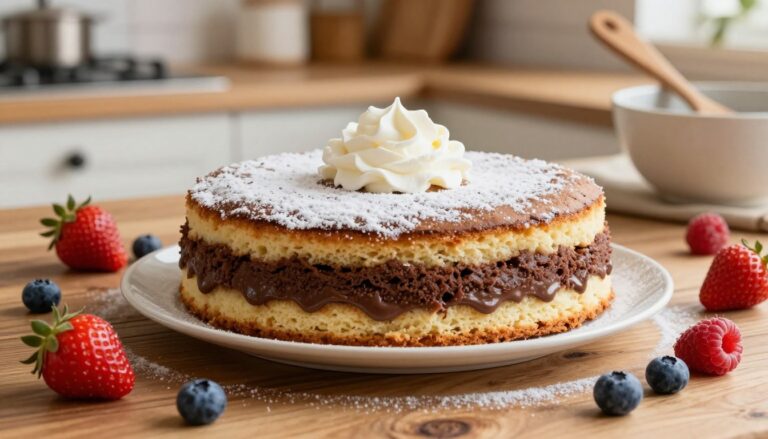
Serving Suggestions for the Perfect Coffee Cake Moment
The best way to enjoy this is simple: decide if you want gooey warmth or neat slices, then serve accordingly. I like both, and each mood has its perks.
Warm vs room-temperature slices
Warm slices deliver gooey streusel and a soft crumb. Heat for a few minutes and the cinnamon pockets sing.
Room temperature slices cut cleaner. They are easier to plate for a brunch spread and hold shape for little hands or neat guests.
Brunch pairings and quick finishes
The classic partner is, of course, a mug of coffee—this cake was made to sit beside one. (No coffee in the batter; just a perfect match.)
- Fresh berries or a simple fruit salad to balance the sweet top.
- A dollop of whipped cream or a light dusting of powdered sugar for a bakery look.
- For crunch, sprinkle chopped nuts; for dessert vibes, add a thin cream drizzle.
| Occasion | Serve warm | Serve room temp |
|---|---|---|
| Lazy Saturday breakfast | Yes — cozy and comforting | No — unless prepping ahead |
| Holiday brunch | Optional — serve some warm | Yes — easy to plate for guests |
| Afternoon coffee break | Yes — quick reheat | Yes — grab-and-go style |
Hosting tip: pre-slice for crowds or leave whole for dramatic presentation. If you want the exact method I use, see my bisquick coffee cake post for full details.
Storing, Freezing, and Reheating Without Drying It Out
Treat leftovers right and every slice will taste like it just came from the oven.
Store the loaf covered at room temperature in an airtight container for about 3 days (sometimes 4). That keeps the crumb soft and the streusel from weeping.
I don’t recommend refrigerating plain cake; the fridge dries baked goods fast unless you have a perishable frosting like cream cheese.
To freeze, wrap the whole cake tightly in plastic and foil or wrap individual squares for quick breakfasts. Label and freeze up to 3 months.
Thaw on the counter while still wrapped, then reheat 15–30 seconds in the microwave for a warm slice. If frozen in the pan, wait to dust with powdered sugar until after thawing.
If a slice seems dry, it was likely overbaked or overmeasured—warm it and add a light glaze to revive texture. This info helps keep each serving cozy and satisfying.